Shelter is your #1 survival priority (even more so than emergency food or water!), so knowing how to make a survival shelter is something everyone should know.
Here we show you how to build a survival shelter with 11 simple designs that could save your life.
Some require a tarp, and some use only debris and wood that has been scavenged.
Don’t forget to practice it so you’ll be prepared should you ever need this survival skill !
Step 1: Choose Your Site
Choose a spot for your wilderness shelter which is:
-
![]() Dry
Dry
-
![]() Flat
Flat
-
![]() Not right next to a body of water.
Not right next to a body of water.
-
![]() Not underneath any cliffs, falling rocks, or dead limbs which could fall on you
Not underneath any cliffs, falling rocks, or dead limbs which could fall on you
-
![]() Is readily visible or very well hidden (depending on whether you want to be found or not)
Is readily visible or very well hidden (depending on whether you want to be found or not)
-
![]() Have a good place for a fire right in front of the doorway (see
how to start a fire without matches
.)
Have a good place for a fire right in front of the doorway (see
how to start a fire without matches
.)
 Dry
Dry
A note about choosing a flat site for your shelter. This is not just for comfort!
If your shelter is on a slope and it starts raining, rainwater can come into your shelter.
If you cannot find a flat spot for building your shelter and rain is likely, you will need to dig trenches to divert the water away from the shelter.
Step 2: Assess Your Needs
Many wilderness survival experts will tell you that this or that method is the best survival shelter. However, it depends on your needs.
Here are some of the things you need to consider:
- How many people are in your group?
- Does your shelter need to be camouflaged?
- How cold is it? Will you build a fire inside or directly in front of your shelter?
- How much time do you have to make the shelter?
- Is the shelter for long-term or short-term use?
Tools
While not essential, it will be a lot easier to make these shelters if you have some basic tools available:
Step 3: Decide On a Type of Shelter
This is the most essential part of building a shelter in the wilderness. If you know a few shelter designs AND know what they are best suited for, you will be able to make the right choice.
1. The Tarp Shelter
You just need a plastic tarp and some cordage for this survival shelter. You can even make it with a rain poncho in a pinch. Just tie each end of the tarp to a tree.
-
![]() Poor protection from wind and rain
Poor protection from wind and rain
-
![]() Could easily break from falling sticks, hard rain, etc.
Could easily break from falling sticks, hard rain, etc.
-
![]() No protection from animals
No protection from animals
 Poor protection from wind and rain
2. Tarp Tent
Just tie some cordage between two trees and drape your tarp over it. Then use some rocks, sticks, or more cordage to anchor the sides of the tarp away from you. Read our guide to survival tarps .
3. Tarp Teepee with Poles
You need to gather some long branches (your poles) and prop them together to form the structure for the teepee (practice this; it is a bit trickier than it may seem to make the structure sturdy!).
Then wrap your tarp around the poles. If it rains, some rain will fall through the hole where the poles meet. You can fix this problem by draping another tarp or poncho over the top. Or, make a bigger hole, and you can even have a fire inside your teepee!
4. Tarp Teepee (no poles)
Fold your tarp into a triangular shape. At the point of the triangle, put a rock into the tarp. Then tie some cordage around the stone. Now hang this cordage from a tree. Anchor the bottom of the tarp down with rocks, and you’ve got yourself a teepee.
5. Snow Shelter
What do you do in an emergency outdoors in the snow?
It will be too cold to spend much time making a shelter—this survival shelter you can make very fast (especially if you have an emergency shovel).
Find a tree and prop a branch against its trunk at a 45-degree angle. Push the snow out of the way to form a “wall.” Prop another branch to support your tarp. Then drape a tarp over the branches.
You can line the inside of this survival shelter with pine needles and brush to act as insulation and keep you warm.
For an alternative that takes much more time, see how to build a snow cave.
6. Fallen Tree Shelter
This is my favorite survival shelter because it can be easily adapted to the situation. It does rely on you being able to find a fallen tree, though.
You can do it in multiple ways, such as draping a tarp over a fallen tree to make a tent. Or you can prop debris to act as your shelter wall. If windy or cold, use other debris to block the entrance.
7. Hammock Survival Shelter
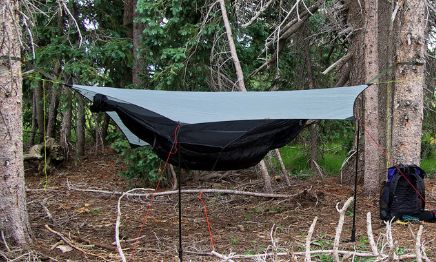
Sometimes you need your survival shelter to be off the ground, such as in jungle situations with creepy-crawly insects and animals around.
This survival shelter design is perfect for that. It is a variation of the tarp tent, just off the ground. Line the survival hammock with your extra clothes to provide some insulation.
Pros
-
![]() Off the ground
Off the ground
8. A-Frame Brush Shelter
This is an excellent short-term survival shelter for a single person because it is fast and easy to build. It is also easy to find materials for making it.
How to Build the Shelter:
- Find one long, sturdy branch. It should be a few feet longer than your height.
- Prop one end of branch up on a tree stump or log. Alternatively, you can prop it up on two shorter branches, making an A shape.
- Lean shorter branches against the branch. Now you have a frame.
- Now cover the frame with leaves, branches, or other brush.
*You can also make this survival shelter against fallen trees. Or, prop up both ends of your long branch for a larger A frame shelter . With this method, though, wind can blow in from the sides, and it also won’t trap your body heat as well.


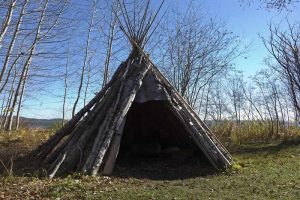
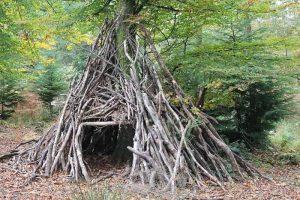
9. Debris Tipi Shelter (Teepee)
You are probably familiar with this shelter design, and maybe you even made a few (I know I made them as a kid). These are relatively easy to build, but you’ll need to have a lot of long branches around.
Another downside of the tipi shelter is that its high, vertical shape makes it relatively unstable during high winds. Because it is large, it won’t trap your body heat as well as a smaller brush shelter would.
How to Build the Shelter:
- Find three long branches that are relatively the same length. Prop these up to make a tripod frame. This can be somewhat difficult to do without a rope. Alternatively, you can prop the branches against a tree to make a modified tipi shelter.
- Add more long branches to the tripod you built. The more branches you build, the sturdier the frame will be. Remember to leave a gap for the doorway to the shelter.
- Keep adding branches, including shorter ones. There should be as few cracks as possible in the frame.
- Cover the frame with leafy branches. Brush doesn’t work very well for covering because it quickly blows away. Birch bark also works great for a covering – don’t peel all the bark away unless you are in an actual survival situation as it will kill the tree!
- If you do use brush for covering the tipi shelter, you’ll need to add more branches to the outside to prevent them from blowing away.
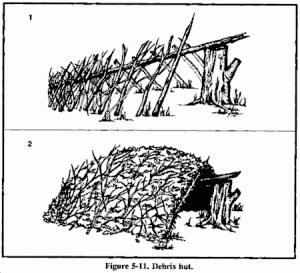
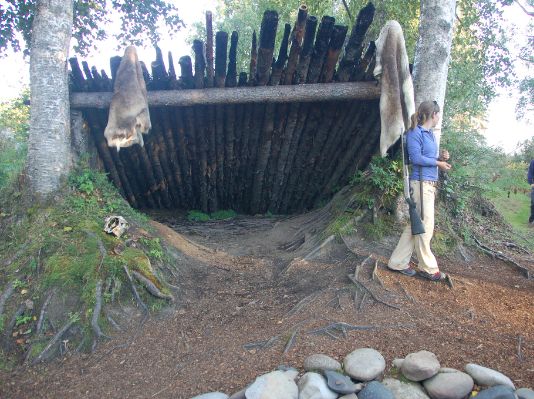
10. Debris Lean-To
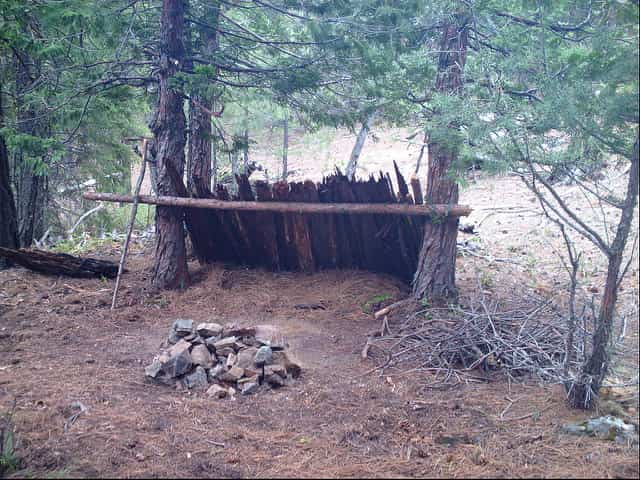
The lean-to shelter is easy to make and roomy. It doesn’t trap body heat, as well as a completely enclosed shelter. However, the wall of the shelter also acts as a fire reflector.
If you make a fire in front of the shelter, the heat will bounce off the wall and keep you warm. To make it even better for cold weather, make a fire reflector/wind screen on the other side of your fire pit.
For a practical demonstration, check this post where we went out into the woods to build a lean to shelter from scratch.
11. Brush Shelter with a Smoke Hole
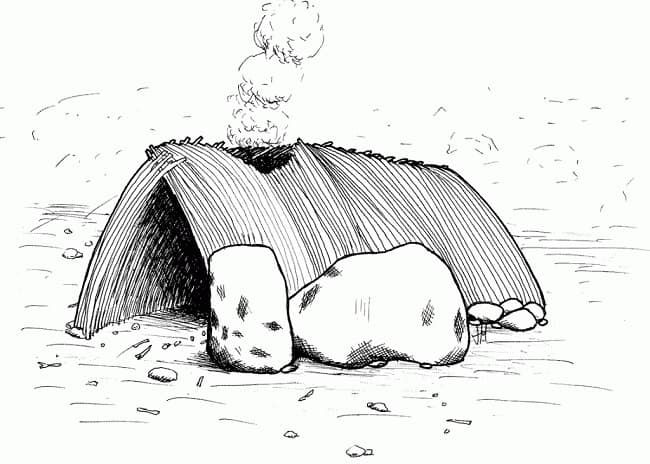
There are a bunch of ways to make shelters with smoke holes. You could make a tipi-style shelter and leave a hole in the top. Or you could dig an earthen pit house shelter with a hole for a fire inside.
Unless it is truly freezing cold, never make a fire inside your shelter! The risk of burning your shelter — and yourself — is too significant. If you do need to make a fire, it will need to be VERY SMALL and controlled.
Since there are so many ways to make smoke hole shelters, I won’t give you instructions here. I’ll save that for a later, more detailed post.
Note that there are plenty of other ways to make a wilderness survival shelter without supplies.
Go out and try some!
That is the only way you can get a feel for which survival shelter is suitable for your unique situation. Have fun!
Have you made a survival shelter before? How did it go? Let us know in the comments.